Filtering Sounds and DSP
About 25 years ago I made some tape (cassette) recordings of my Mother and Father, remembering family and local history from long before I was born. Now that my parents are dead, these recordings are valuable as personal mementoes, and also as ‘historic’ recordings where they describe a long-gone age. To me, the sound of people I knew is more evocative of their personality than a still photograph. I recently started transferring these recordings from tape onto audio CDs. The recordings were made in various locations using assorted recording equipment. Some of them sound fine, but others suffer from problems which many recording enthusiasts will recognise only too well – mains ‘hum’ and background noise. Listening as I transferred them to CD I decided it was time to try and deal with these audible problems and clean up the results...
In general, the kind of processing employed to ‘clean up’ such recordings when they are in the form of digital information tends to be called ‘DSP’ or Digital Signal Processing. This is a truly vast, and horrendously complicated field. So here I am just going to dip a toe into the water and use some basic methods with a specific task in mind. I’ll start by explaining the basic method I used. I’ll keep the explanation as simple as possible, although I will use some algebra as this should help readers who are happy with the relevant maths. But don’t panic if you are allergic to algebra! As with the previous articles in this series, I have provided an accompanying application which shows how the methods I will describe can be used in practice. So if you wish, you can use that without worrying too much about all the details of the following explanation.
The application accompanying this article is called !TrackNotch. You set this up in the same way as previous examples I have provided for this series on sound data files. It will expect to find input sound data files in a CDtrack_in directory, and will place the (filtered) output into the CDtrack_out directory. The location of both these directories is indicated by the contents of the path file inside the application.
The digitised sound data on a CD (and in the sound data files) represents the sound as a series of values which represent successive samples. I won’t explain that in detail again as it was covered in an earlier article. In practice the data will be stereo, but here I’ll just consider one channel. We can represent this pattern in terms of a series of values,  where the subscript tells the order of the values as they were recorded, one after another. For CD audio these values were recorded at intervals of 1/44,100’th of a second apart. We can present these values, in sequence, to some form of numerical process which uses them to compute some ‘new’ values. These we can represent as a new series of values,
  ... By appropriate design of the numerical computation, the output series of values will have been filtered - i.e. the relative amplitudes or phases of components at various frequencies will have been changed in a pre-defined manner.
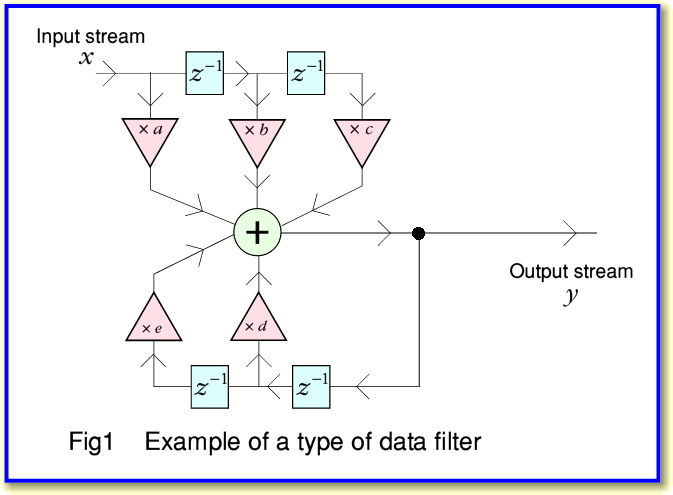
There is a a vast number of arrangements we could choose. Here I will use a specific type of arrangement illustrated in Figure 1. We can imagine the series of input samples,  , flowing into the system one after another. Each time a new one arrives, the system generates a new output value we can call
  . The boxes in the diagram with
  on them are delays. They take in a value, remember it, and then regurgitate it one sample interval later. This means that for the illustrated arrangement the output is a sum which has contributions from the ‘current’
  value as well as the previous two
  values which have been delayed and held by the
  boxes. It also has contributions from the last two
  values which the system output. (The use of
  to indicate a delay to store a value like this is the established convention for reasons I won’t explain.)
In terms of the descriptions used in DSP, the use of delayed samples from the input series is called a Feed Forward arrangement. The use of delayed samples from the output, is called a Feed Back arrangement because is ‘feeds back’ into the system some of the previously generated values.
In terms of a computer programme we might write a loop which took some sound data in an input array  and generated an output in an array
  using a loop something like
xd1=0
xd2=0
yd1=0
yd2=0
for n = 0 to M
y[n]=a*x[n] + b*xd1 + c*xd2 + d*yd1 + e*yd2
xd2=xd1
xd1=x[n]
yd2=yd1
yd1=y[n]
next
Where the variables which we set to zero before starting are the locations then used to store the ‘delayed’ input and output values.
This programme carries out the same process as the flow diagram in Figure 1. By choosing appropriate values for coefficients,  we can now make the system function as a form of filter. Once this is done, we could run the loop, feed our series of input data values, and collect the resulting output series of values as the filtered result.
I won’t attempt to explain the theory behind what follows, and I’ll ignore all kinds of complications. Instead I’ll simply give some ‘design rules’ for choosing the values for the coefficients. Here my interest is in eventually obtaining a ‘notch’ filter that will reject a chosen frequency, and so the design rules are chosen with that in mind.
1) Choose a ‘notch frequency’ ,  , that we want to suppress. Use this to work out a value
where  is the sampling frequency (one over the time interval between sample values).
Let’s initially assume we wanted a notch at 50 Hz, so  = 50. The sampling frequency for CD is
  44100 Hz, hence this would give us a value of
  1·99994925.
The above steps determine the frequency which the filter will try to suppress.
2) We now have to choose two values that affect the depth and narrowness of the notch in the frequency response. I will call these values  and
and  . Both of these values must be in the range from 0 to 1, and we should choose them such that
  is slightly less than
  . For the sake of an example, I will choose
  = 1·0 and
  = 0·995. (These are also the values written into !TrackNotch.)
3) We can now work out the required coefficient values using the recipe
(note that  and
and  will be negative).
Figure 2 shows the gain/frequency response of the resulting DSP filter. You can see a deep ‘notch’ in the response with its minimum located at 50Hz. The filter isn’t ideal because the arrangement I have chosen is quite a simple one. The main imperfection is that frequencies below the chosen notch frequency are also slightly attenuated. However for a 50Hz audio filter this isn’t likely to be a serious problem. By using other methods, or playing around with the values, we could get an even better filter. However the arrangement should do if we simply want to suppress a 50Hz ‘hum’ from a sound recording.
If you run !TrackNotch it will ask you for the name of the input sound data file you wish to filter. It will then ask you what notch frequency you wish to use. Enter this value in Hz – i.e. type in 50.0 and press return if you want to suppress 50Hz hum from a recording. It then asks if you want ‘dithering’. I recommend you type ‘y’ and then press return in answer to this question. The application then processes the sound data.
Rather than preset the application to always notch 50Hz I decided to give you the option to use it for whatever frequency you choose. Thus it could also be used to remove an unwanted tone or whistle at some other frequency. In some cases main ‘hum’ may actually contain a lot of 100Hz or 150Hz ‘buzz’. This can be more audible than 50Hz, so you may find that choosing to notch 100.0 or 150.0 Hz will give a better result with a recording that is badly affected by mains hum or buzz. In principle, you can run the sound data through the filtering process more than once. However if you do, each filtering action will also have some effect on other frequency components, so take care to check the results as it may end up sounding poor for other reasons. Note also that the filtering computation can take some time, so if the input file is long, you may find it worth planning to have a cup of tea or coffee whilst you wait for the process to finish!
In fact, !TrackNotch is rather more flexible than I have described so far. But I will postpone explaining that, and dither, until a future article.
Jim Lesurf
9th Aug 2006