Examining Sound Files
For the previous article on manipulating sound data files I used an application called !TrackMaker as an example. This allows the user to ‘snip’ a sound data file taken from an audio CD into ‘tracks’, and hence allow the editing of sound files. However people also often want to manipulate the sound in various other ways. Perhaps the most common requirement is to alter the volume level or to ‘fade away’ the ending of a recording. For example, with a recording of a concert of classical music the applause may last for some time. It may be useful to fade away this so as to avoid a snipped track abruptly going from loud applause to silence.
Although in principle modifying the sound level is quite simple, there are some snags that can trap the unwary – particularly as they may degrade the results in subtle ways which the user only learns about when it is too late and the unaffected original may be lost. Hence before looking in detail at how to modify sound levels I want to introduce two applications. These allow the user to examine the sound data, and avoid problems later on...
The two applications I’ve written as examples here are !TrackStats and !TrackTrans. As with !TrackMaker I’ve given Paul copies of these to make available with Archive. The rest of this article explains how to use them, how they work, and their purpose. As with !TrackMaker they are provided partly as examples to illustrate how CD sound data can be manipulated, and partly to serve a useful purpose.
Setting up these two new applications is similar to what was required for !TrackMaker. Inside each application is a text file called Path. This contains the pathname of the directory which the application will expect to contain the sound data files. In my case I put these in ADFS::HardDisc4.$.CD_Tracks.analyse so if you look in the Path file you will see this string. Change this to the path for the directory where you want to put the files to analyse.
Note that the two new applications differ from !TrackMaker as they save their output to files they create on the ramdisc. Hence you’ll need to have some ramdisc for output to be saved! The output appears as text files, with readable numbers separated by commas. This form of output means you can read the results, and load them into a graph drawing application like !Tau.
Lets start with !TrackStats.
Having set the required path and placed a sound data file in that directory we can run !TrackStats in the usual way. This opens a taskwindow and we type in the name of the file to be examined and press the return key. The program then starts reading in the data from the file in 0·1 second ‘chunks’ or blocks. It finds the peak signal level in each block for both the left and right hand channels and writes out these values. It then repeats this for the next 0·1 second block until it gets to the end of the sound file. It also notes the highest level it finds for each channel during the entire duration of the sound file, and reports these after listing the levels in each 0·1 second block.
If your sound file was called Fred, you will find that once the process has finished there is a new file called powers_Fred in your ramdisc. (The contents are also listed as a sort of ‘running commentary’ as the program runs.) Each line of this file has three values. The first of these is the time (in seconds) that each block started. The next two values are the peak power levels found for the left, and then right, channel. Note that these values are in decibels (dB) with respect to the maximum possible level which a data value on a CD can indicate. This means that full maximum – i.e. the loudest possible volume level – corresponds to “0·00”, and that any lower levels will be negative numbers.
If you aren’t familiar with the use of decibels in electronics this way of representing values may seem weird. However it is extremely useful when engineers are dealing with values which can vary over a very wide range since it is ‘logarithmic’. In simple terms we can say that ‘-3dB’ means ‘about half power’, ‘–10dB’ means ‘one tenth power, ‘-20dB’ means ‘about one hundredth power’, ‘-30dB’ means ‘one thousandth power’, ... , ‘-60dB’ means ‘one millionth power’, etc. If you look in audio magazines, measurements like spectra are often given with power levels quoted in decibels. I have written the programs so that any values below ‘one ten thousand millionth of full power’ are trapped to give ‘-100dB’.
Whilst finding the peak left/right power levels in each 0·1 second block the program also keeps a note of how often given values appear. Once it has finished the sound file it then prints out a set of values which represents a histogram of how often particular levels appear. This histogram has a resolution of 1dB. If your input file was Fred, then these results are saved to the ramdisc in the file hist_Fred. Again, this has three values per line. The first is the power level, and the next two specify what percentage of the examined blocks had this peak power level. As before, the value for left channel value is printed before that for the right channel, and the program lists these as a ‘running commentary’ as it works, so you can also see them in the taskwindow.
The purpose of this output is that you can now assess the sound levels recorded in the sound data file – both in terms of how the volume changes as time passes and how often any given level occurs. This information is useful if you are thinking of trying to process the sound data to alter the volume level, etc. The application source code also illustrates how the sound data can be read and examined.
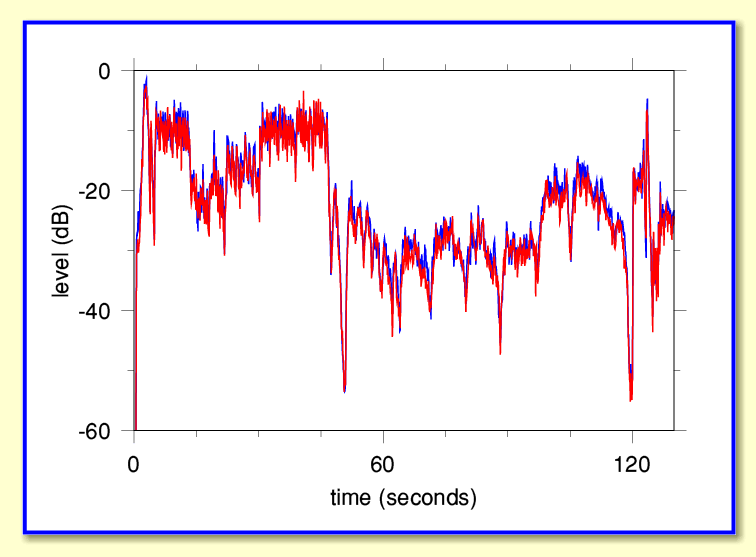
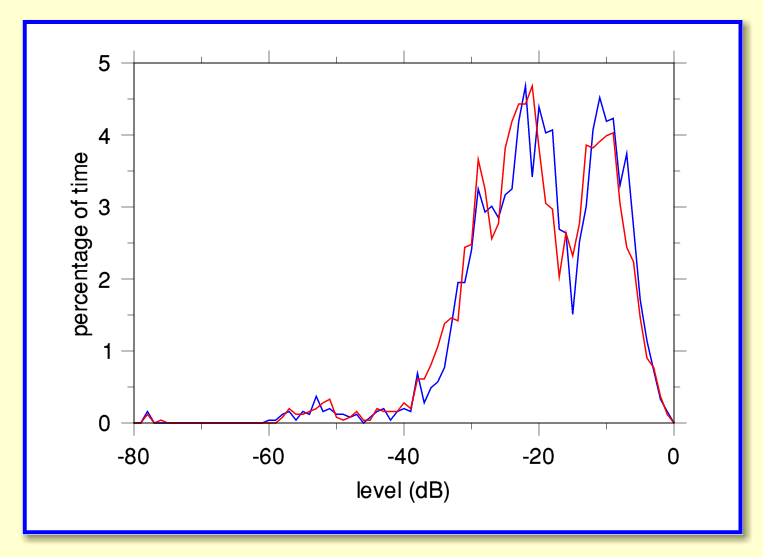
Figures 1 & 2 show examples of the kind of results that can be obtained and then plotted (using !Tau). These examples were taken from a track on a commercial CD so that if you wish you could choose to listen to a copy and judge the displayed results. The CD is HMS Pinafore performed by the WNO, conducted by Sir Charles Mackerras (Telarc CD 80374).
Figure 1 shows the sound level during each 0·1 second of the first track of the HMS Pinafore recording. There are two lines – red for the left channel, and blue for the right channel. For clarity I’ve only plotted the first 125 seconds. The entire track lasts for just over 250 seconds.
Figure 2 shows a histogram that displays what percentage of the time the sound was at a given volume level (histogram ‘bin’ resolution of 1dB). As for Fig 1, two lines are plotted for the two stereo channels, with left being in red, and right in blue.
Looking at this you can see that this particular recording of music spends most of the time either at about -12dB for ‘loud’ passages or at about -22dB for ‘quieter’ passages. There is also a ‘tail’ of periods which are at lower volumes. The isolated peak just above -80dB is probably the recording equipment background noise level for the recording, so this occurs when the actual performers are silent at the start and end of the track.
The above analysis also gave peak levels for the entire track of about –1·4dB for each channel. This, combined with the above, shows that the overall level recorded on this commercial CD has been adjusted to use up the full range. Hence, unsurprisingly, this excellent recording would not warrant any alterations. However this isn’t always the case as I hope to show in a later article...
!TrackTrans needs to be set up and used in much the same way. When you run it, the program asks you for the name of the sound file to examine. But it then asks you for a time in seconds. This is because it examines a 1/20th of a second section of the sound file, not the entire file. Hence it wants to know where in the file you wish the selected section to start. It then finds and loads that section of data and uses a Fourier Transform to work out its power-frequency spectrum. Just like !TrackStats it saves its output onto your ramdisc so you can read the results and plot them if you wish.
The program displays and saves two sets of information. One of the saved files – whose file name begins with waves_ – contains the sample values for the waveforms in the selected portion of the sound file in a format you can read and graph. Each line of text in the waves_ file has three values. The first is the time (in milliseconds) from the start of the selected portion of the sound file. The second and third values are the left and right channel sample values, scaled so that ‘1·0’ represents the largest possible value.
The other file – with a name that starts with spec_ – contains the power-frequency spectra of the left and right hand channels for the selected portion. Each line of the file has three values. The first is the frequency (in kHz), and the other two are the power levels for the left and right channels at that frequency. These values are in decibels relative to a 0dB level which would cause a sinewave component to be as large as possible without exceeding the amplitude range limits of CD sample values.
One word of caution about using !TrackTrans. I deliberately wrote this using a plain-and-simple form of Fourier Transform with no programming ‘tweaks’ to make the program run faster. The reason for this was that I wanted the program source code to be readable so that anyone who wishes can use it to understand what the program is doing. This means the program takes some time to compute the spectra. For ‘serious’ use faster methods can be used, but may have the effect of making the actual program code indecipherable by most mere humans! The above said, the program does work, so is fine – provided you don’t need to work out a lot of spectra in a hurry.
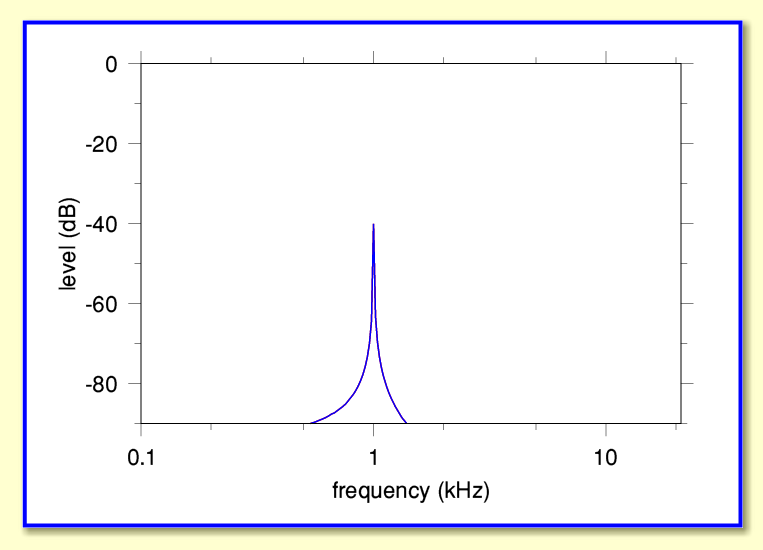
Figure 3 shows an example of the spectrum obtained when the input sound data file contains a test sinewave at a level 40dB below maximum and a frequency of 1 kHz. (There are actually two lines plotted here for the left and right channels, but their spectra are identical so only one of them is visible on the plot.) In this case I used !Tau to plot the results with a log frequency scale.
!TrackStats and !TrackTrans are essentially measurement instruments which you can use to check on the contents of sound data files. In a later article I intend to explain how to modify sound data and use them to check the results.
Jim Lesurf
13th Jun 2006


