Some time ago I explained of how we can create data files to use as ‘test waveforms’ we can put onto an Audio CD. I’d now like to revisit this topic in more detail. To do so, I’ve produced a new application in the ‘Track’ series which I’ve call TrackGen. The way you set up and use TrackGen is basically the same as the previous applications I’ve produced for this series, so I won’t go over all the details here. I’ll just deal with specific points needed to use TrackGen.
If you look inside the TrackGen application you will find a ‘Path’ file. As with earlier Track applications this contains the address of the directory where output will be placed. I’ve used the same location as for various previous applications, but you can change this to whatever directory suits you. You’ll also find two other special files, ‘Settings’ and ‘UserData’, which I’ll discuss later.
When you run TrackGen it opens a TaskWindow and asks you to select from a menu of choices. These are “S = Sinewave / Q = Squarewave / T = Trianglewave / I = Impulse / U = User”. Type in one of the initial letters and press <return> to choose the waveform you require. So, for example, if you press ‘S’ (or ‘s’) then Sinewave will be selected. The application then presents another menu of choices, “M = Mono / L = Left / R = Right / A = Antiphase”. Type the relevant letter and press <return> to select which of these you require. The application then asks for a signal amplitude. This is in dB with 0·0dB representing the waveform size that just peaks with its largest sample values at the maximum allowed for Audio CD. Type in a number (including a decimal point) and press <return>. The application now asks for a frequency in Hz. Type in the required frequency and press <return>. The application then creates the required sound data file. Note that the name given to the file reflects the choices you made, and indicates what the file contains.
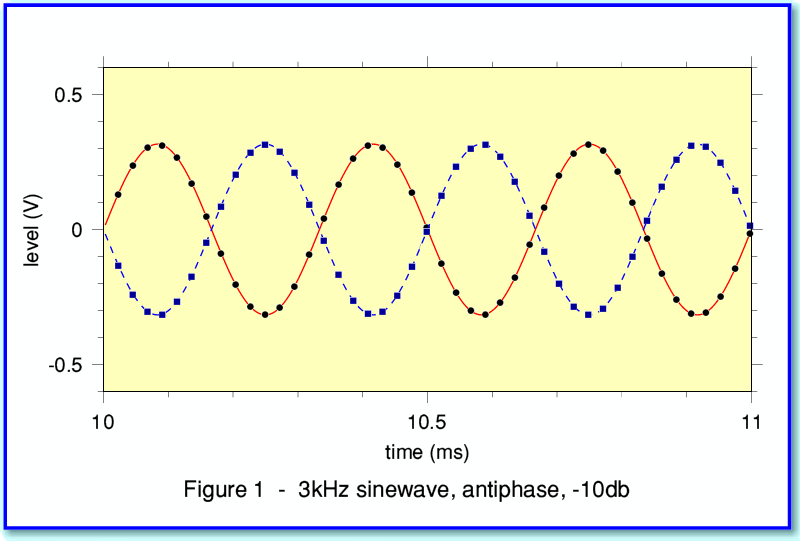
Figure 1 illustrates an example of the waveforms which can be created. In this case I asked for a sinewave, with the left and right channels in antiphase, with a frequency of 3kHz and an amplitude of -10dB.
To make the start and end of each track more obvious when written to a CD it is convenient to have a few seconds of ‘silence’ at the start/end of each track. We also may want to alter the duration of the track. This is where the values in the ‘Settings’ file come in. These are integer values in seconds. The first number sets how many seconds of silence there will be at the start of each track. The second sets the duration of the test tone in seconds. The third sets how many seconds of silence there will be at the end of the track.
The application works by using generating a data block one second long. Initially this block has all its values zeroed. This block of zeros is then written the appropriate number of times into the output file to produce the starting silence. The block is then loaded with the required waveform, and this is written the relevant number of times to generate the test tones in the file. Finally the block is zeroed again, and written out to produce the ending silence.
The advantage of this method is that it is very quick and easy. However it has some limitations...
Consider first the impact when we want to write a sinewave test signal. In order to ensure that each block of one second in the file joins neatly to its neighbours we have to ensure that the chosen frequency is an integer number of Hz. This means that if you ask for a frequency which isn’t exactly like this the application will ‘correct’ the frequency to avoid jumps in the waveform at 1 second intervals.
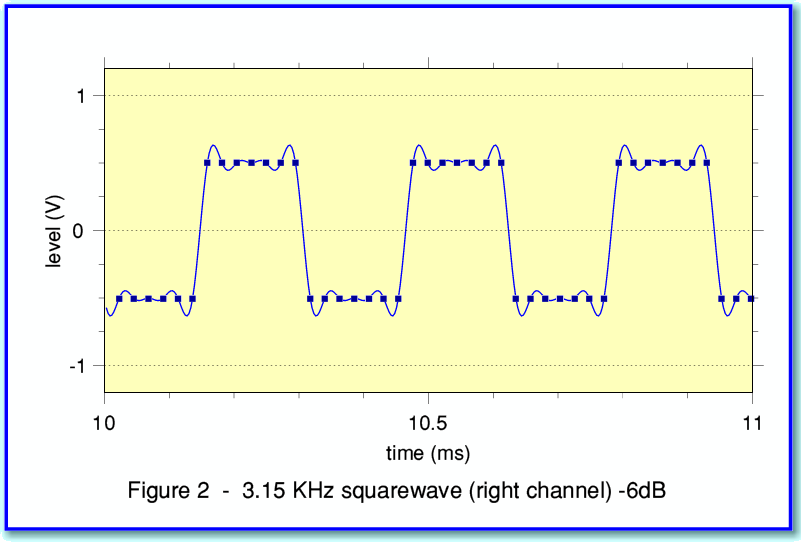
A similar requirement also applies to the other test waveforms, but in those cases there is another potential snag. I can illustrate this with Figure 2.
This shows an example of a squarewave. As with the other figures the line shows the actual waveform which the samples define, and the ‘blobs’ show the sample values. Here I’ve arranged for the waveform to consist of runs of sample values which are all at the top or bottom of the squarewave. However note that the actual waveform shape is not a perfect squarewave. It has ‘wiggles’ around the changes in level. This is because – as with any real waveform – the signal has a finite bandwidth. For audio CD the signals can only contain frequencies up to just under 22·05kHz. We can’t have discontinuous changes at the edges, nor can the actual top and bottom be absolutely flat. Hence the wiggles.
Fortunately, if we arrange for the samples to be ‘synchronised’ to the squarewave’s fundamental frequency this doesn’t matter. If you look at Figure 2 carefully you can see that each cycle of the squarewave has exactly 14 samples (7 at the top and 7 at the bottom). This avoids having to work out sample values to fit in other places up and down the ‘wiggles’ of the shape of the bandwidth limited squarewave, and makes life easy. However this comes at a price. Now, as well as having to ensure there are an integer number of cycles per second, we also have to ensure that we have an even integer number of samples per cycle. This is actually quite restrictive and it means there are only a few possible frequencies. Fortunately, in practice this rarely matters for simple audio purposes. A similar requirement applies for the impulse and triangle wave cases. To deal with the above, when you ask for a square/triangle/impulse waveform, the frequency you ask for will be ‘corrected’ to be the closest convenient value that satisfies the requirements.
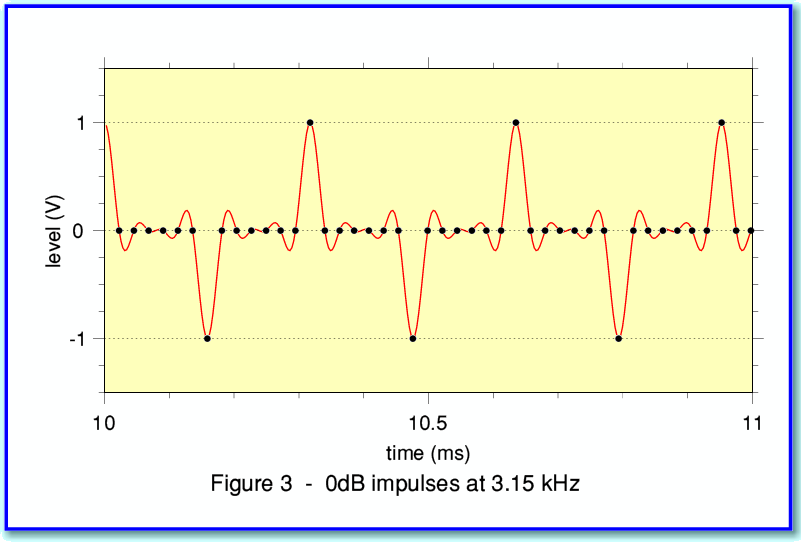
Figure 3 also illustrates this. As with the squarewave example I asked for 3kHz, but the application corrected this to a frequency that ensures each cycle is the same as all the others in the waveform. The result is actually at 3·15kHz.
Impulse waveforms are useful for probing the frequency response of a component/system. They’re also useful for testing how a system copes with ‘spikes’ or sudden transients. As I pointed out in a previous example in this series it is possible for a set of sample values to define a waveform that actually extends beyond the range of any possible individual sample. I therefore decided to use an ultra-extreme example of this to show how the “User” waveform choice works.
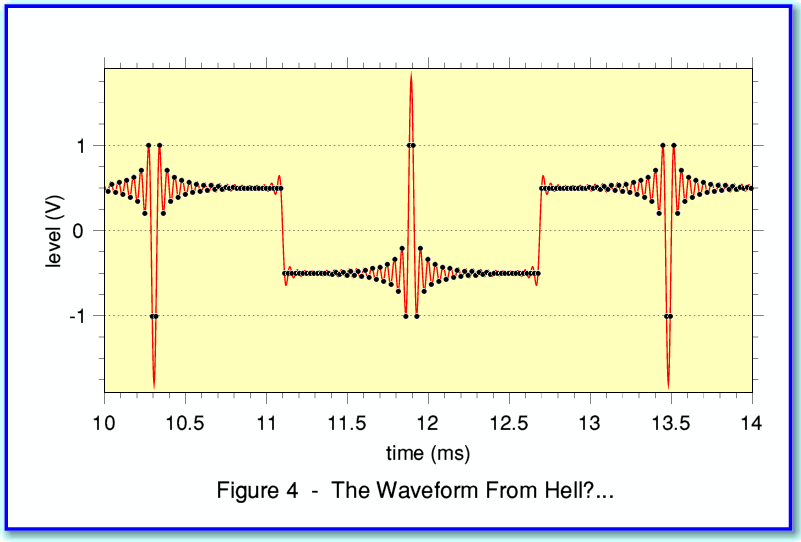
If you choose the “User” waveform from the first menu then TrackGen will read the values listed in the ‘UserData’ file. This consists of a series of floating point values, one per line. Note that the values are scaled so that the full range is from +1·0 to -1·0. These are then used to create the block of values for writing to each second of test signal in the sound data file. If you wanted, the UserData file could therefore consist of 44,100 values which would define ever individual sample during the one second block. However in most cases it is likely that the required waveform will be periodic. I’ve therefore arranged for the application to make use of much shorter sets of values. The data I’ve provided with TrackGen produces waveforms like those shown in Figure 4.
The data I used consists of just 140 values. This is enough to define one cycle of a waveform that repeats with a frequency of 44100/140 = 315 Hz. The application starts reading the values and finds that the file runs out after 140 numbers. However it still has most of the 44,100 sample pairs in the data block to set. So it ‘rewinds’ back to the top of the UserData and continues. It repeatedly does this until every place in the one second of data is defined.
What this behaviour means is that you can place a set of values into your UserData file and the application will just keep cycling through them until it has read 44,100 values. Provided you ensure the number of values you’ve given divides into 44,100 without a remainder then the result is a periodic waveform with no unintended ‘jumps’ at the start/end of each second of sound data. You can use this to produce your own waveform shapes for test purpose without having to generate many thousands of values. Note that the above ‘rewind’ method means the application won’t ask for a ‘frequency’ when ‘User’ is chosen because it will derive this from the supplied contents of the UserData file. In effect, it is determined by how many times it has to rewind.
The example in Figure 4 uses a combination of a squarewave and a scaled/offset impulse (sinc) pattern to generate the largest possible ‘out of range’ peaks when the waveform is correctly reconstructed. I should caution you about using this as an actual test waveform. I don’t know of any CD player which will play this at the 0dB level without gross distortion! It is also likely to be exceptionally demanding on amplifiers and loudspeakers. I’ve given it as an example to show the flexibility of the ‘UserData’ choice, and it illustrates how large a signal can be required from a set of sample values. In this case, a player that would produce +/-1Volt from a full size sinewave would have to produce around +/- 1·6Volts to cope with the peaks of the waveform!
In general, if you use TestGen to produce test waveforms for audio I’d recommend using levels no greater than -10dB for most purposes, and to keep down the volume. Otherwise there is a real risk that you may damage equipment. For example, it is easy to damage the tweeters of a loudspeaker with test tones – particularly at high frequencies which you may not hear clearly. Even speakers rated at, say, “100 Watts” for music often have tweeters that will fail in a few seconds if you apply a sinewave continuously at just 5-10Watts. So please use any test tones with great caution. You’ve been warned, so neither Paul nor I will be paying if you break something!
1700 Words
14th May 2007
Jim Lesurf