Surprises and Whispers
First the ‘bad news’ – I’m afraid that there isn’t a new application or program to demonstrate what I want to talk about this time! However there is some ‘good news’ about the application, TrackNotch, that was provided with the previous article in this series.
Let’s imagine that you have a sound recording which has a hum or whistle that you want to use TrackNotch to suppress. However the recording is quite long, and you want to use TrackMaker to snip it up into a series of shorter tracks. This will make the result easier to navigate when it is on a CD. Since TrackNotch is quite slow, this would also allow you to conveniently break up filtering the recording into a series of short sessions. However there is a snag...
The filtering process that the program uses relies on it having a ‘memory’ of what the input and output have been during recent samples. If you look again at the diagram of the filter process in the last issue of Archive you can see that the ‘feedback’ part essentially recirculates the recent output back into the process. Alas, when we start at the beginning of a fresh sound data file the values stored in these memory locations all start off being set to zero. It then takes a while before the process ‘settles down’ and can effectively suppress any signal at the unwanted notch frequency. Consider the example of a 50Hz sinewave due to mains hum. If this abruptly appears (as it may at the start of a file) there may be a brief ‘thump’ as the filter reacts to this and gets to grips with rejecting it.
Now this may not matter much at the start of a long file as we may get a faint thump at the start of the sound file, but then not hear any hum during the rest when we have the sounds we want to hear. However if we have snipped up a long recording into a set of shorter files, we may then find a brief thump can be heard each time a new track starts.
To deal with this, TrackNotch has an extra feature. It can be told to remember the state its filter memory was in when it finished with the last file. When you then use it with a series of snipped tracks from a longer input this allows it to suppress the potential thump at the start of each track as the stored memory info warns it what to expect at the start of the next track. To enable this feature you need to edit last line of the “settings” file inside the TrackNotch application directory.
As supplied you will find the last line is “0”. If you change this to “1”, TrackNotch enters ‘series mode’. When it is run it will look for a data file which it may have previously saved onto your ramdisc. If it find this, it reads the previous memory values from the file. Once it has finished filtering the current sound file it writes a new file to ram to hold the updated memory values. If it can’t find such a file it assumes you are starting a new series and uses initial memory values of zero, just like when working on a single file, not a series.
This method means that if you wish you can temporarily copy the storage file onto your hard disc if you switch the computer off, or want to process some other files. Then reload it to ram if needed again. To go back to single file mode, just turn the value in the last line of the settings file to “0” again.
The ‘Surprises’ I mentioned in the title refers both to the thumps which you might not expect, and to this extra feature to deal with them. The ‘Whispers’ refer to something else...
In earlier articles I have referred to ‘dithering’, and some of the applications described in this series ask if you want to use this. I’d now like to explain what this is, and why it is important and very useful.
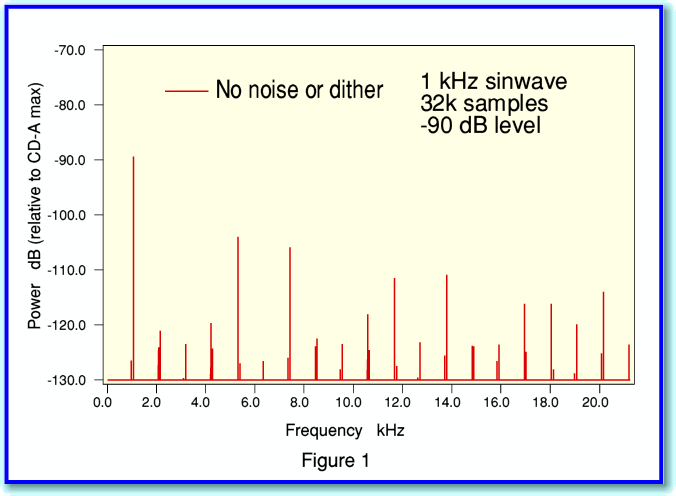
For the sake of example, I calculated the sample values for a very small (-90dBFS) 1kHz sinewave. In effect this synthesises what would be recorded onto CD if we simply used a 16-bit analog to digital convertor (ADC) to sample a perfect sinewave oscillator producing a clean sinewave at this low amplitude. When the result is Fourier Transformed to obtain its spectrum it looks like the plot shown in Figure 1. Not what you might have expected! The result is clearly not a sinewave.
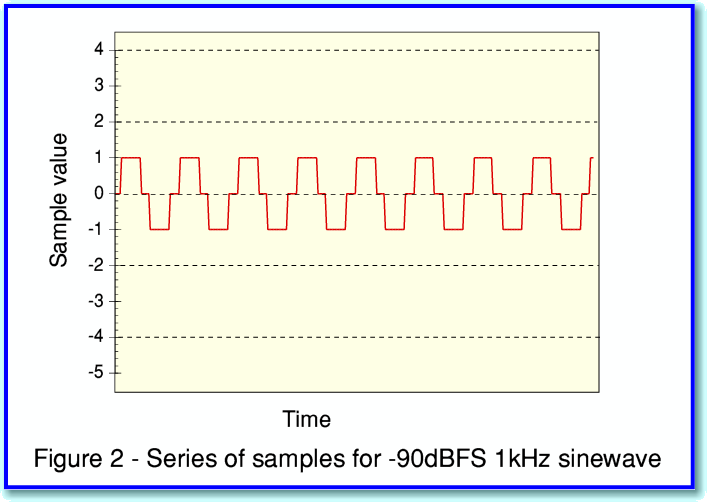
The explanation for the above result is that the CD samples are a series of integer values. So the level recorded at each sampled instant is ‘rounded’ to the nearest integer. This produces a series of samples which look like what is displayed in Figure 2 where I have plotted a series of samples for the -90dBFS 1kHz sinewave against time.
(For simplicity I have ‘joined up the dots’ in figure 2 and only show the line linking successive samples.)
This shows that the waveform we would have recorded onto CD is far from being a sinewave!
The problem is that the regularity of the ‘steps’ between integers produces a nonlinearity (distortion) and so ruins the waveform shape. Instead of a smooth sinewave we get a ‘staircase effect’. If we are recording a signal that is much larger, then the size of the steps on the staircase are tiny compared with the size of the waveform we want to record, and the disortion is much less obvious. However they would still be present if we proceeded simply by recording the waveform as I have described thus far.
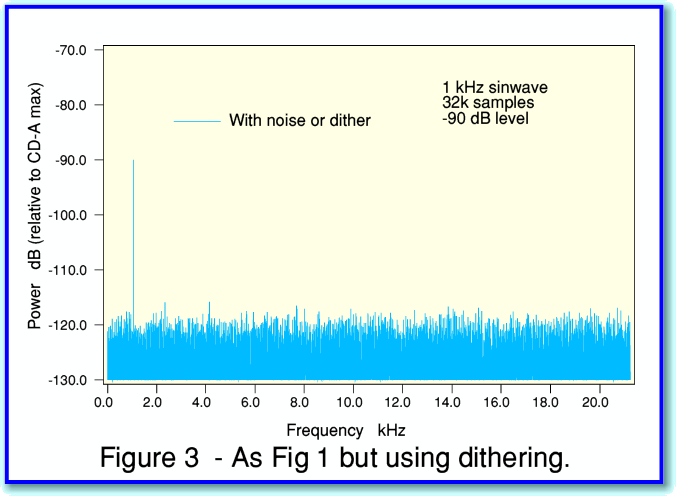
The good news is that there is a solution, but it comes with a price-tag. The solution is ‘dithering’ and you can see the effect of using this in figure 3.
If you compare figures 1 and 3 you can see that dithering removes the distortion ‘spikes’ from the spectrum. Instead we have wideband background noise. We have traded away distortion for some low level noise. In audio the result sounds much better, and from Information Theory there are good reasons for applying dithering. A fuller description of the details, and the reasons for this can be found on one of my websites. However here I can illustrate how dithering is applied and work using another figure.
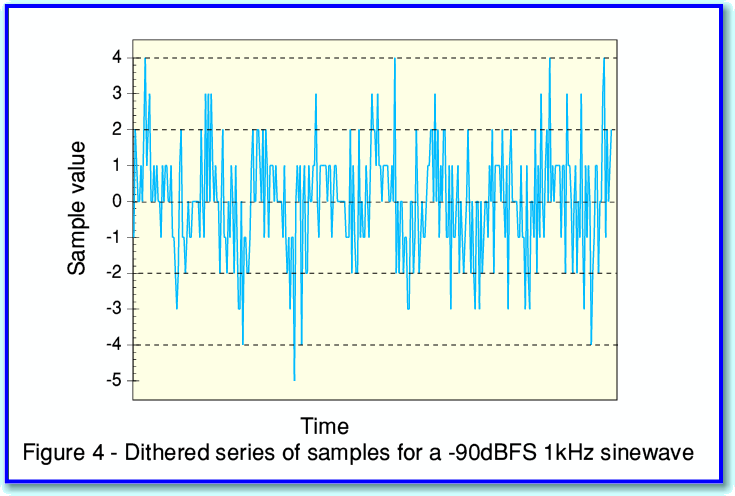
The actual sinewave we wish to record is exactly the same in figures 2 and 4. However the sampled patterns look quite different. This is because ditherting deliberately adds some ‘random noise’ to the level we wish to record before it is sampled into integer values. This randomises and blurs away the regularity of the steps that caused the distortion. Instead, we get some noise accompanying the signal we wanted to record.
In practice, when recording live music with microphones, there will be some random noise picked up or generated in the microphones, amplifiers, etc. If this is loud enough it will actually dither the recording for us. But if not, then dither has to be deliberately applied.
When we reprocess recorded signals which are represented by a set of integers dithering also becomes desirable as it helps to break up any rounding regularities in the use of integers. Hence in general, when reprocessing CD recordings it makes sense to add some dither into the process. This is why some of the programs I have provided as examples for this series give you the option to employ dithering. Most recorded sounds will be at levels much higher than -90dBFS. This means that the presence or absence of dithering may pass unnoticed in many cases. So it is optional.
Dithering (and a close cousin, ‘noise shaping’) are very important and complex areas in the handling of digital recordings, so there is far more to the topic that I can cover here. However the above should give a flavour of how dithering works, and why it is useful.
Jim Lesurf
29th Sep 2006